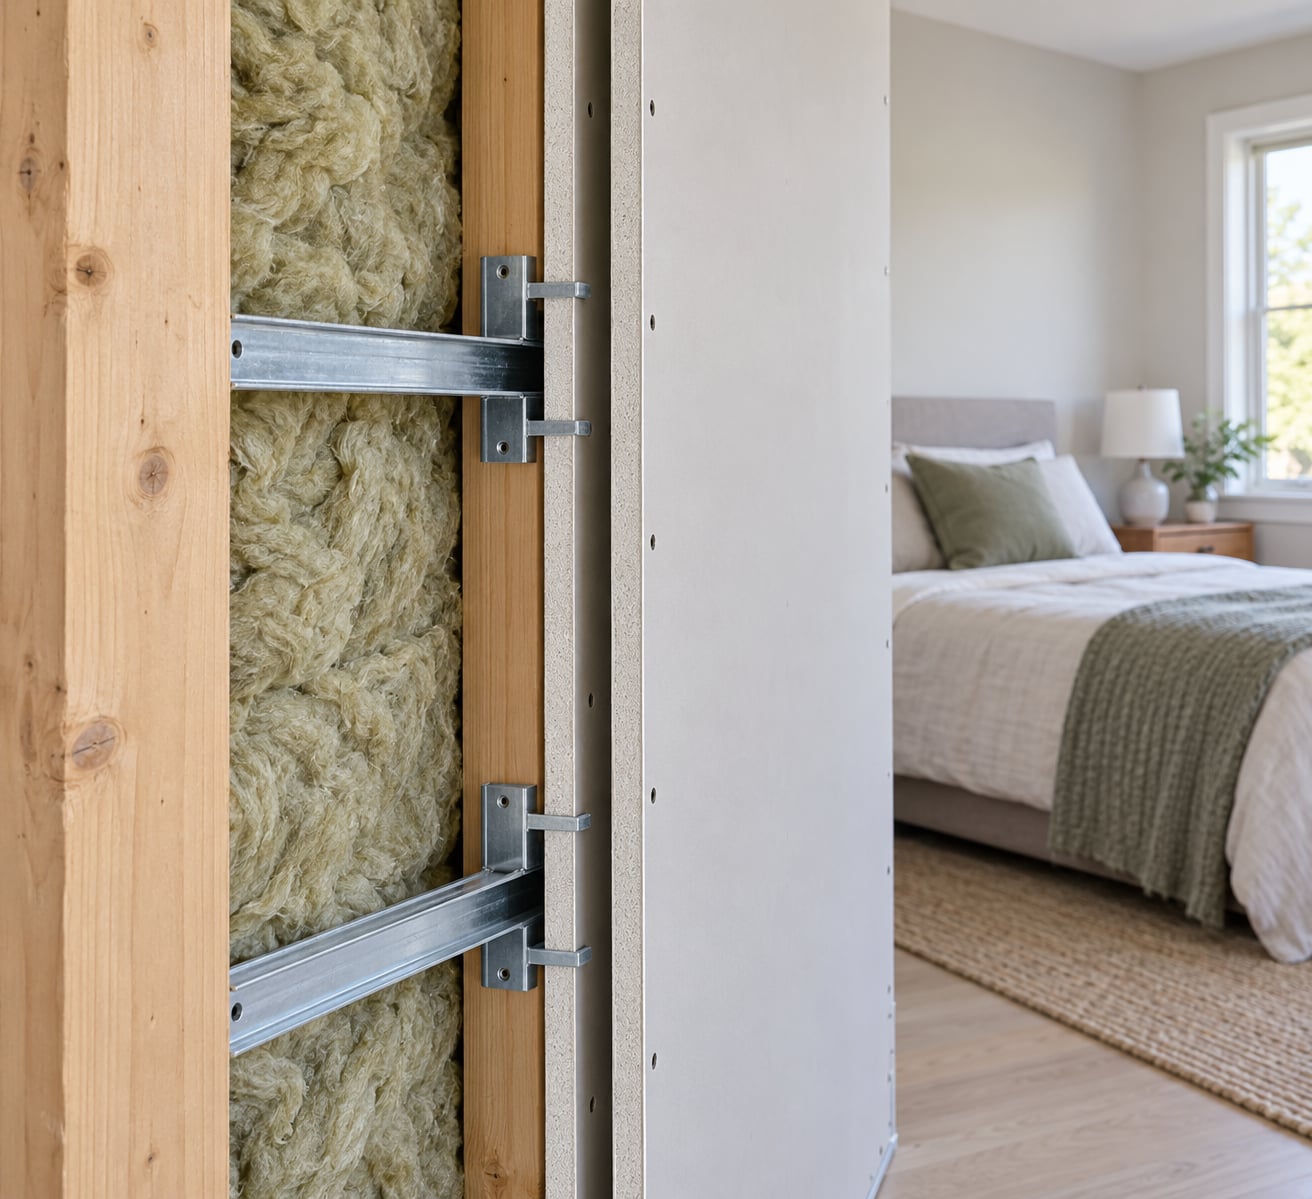
To soundproof a bedroom wall you combine four things: add mass, seal every air gap, fill the cavity with dense insulation, and decouple the drywall from the studs so vibration can’t bridge straight through. Start with sealing, because it costs the least and fixes the leaks people usually discover months later. If the wall still leaks speech after that, move up the ladder to insulation and a second drywall layer, then to resilient channels, and finally to a freestanding wall built in front of the existing one.
Most bedroom noise isn’t mysterious. It comes through the nearest outlet box, the gap under the door, or the bare stud cavity, and a bedroom built with 2x4s and half-inch drywall transmits more sound than most people expect. Below is the order I’d work in, cheapest and least disruptive first, with a way to judge whether each stage actually helped before you spend money on the next one.
One note on wording, because it causes more wasted spending than anything else online. Soundproofing means stopping sound from passing through a wall. Sound absorption means reducing echo inside a room. Acoustic foam and fabric panels do the second thing beautifully and the first thing not at all.
Table of Contents
- What You Need
- For sealing (step 1)
- For filling the cavity (step 2)
- For decoupling (step 3)
- For adding mass (step 4)
- For a freestanding wall (step 5)
- Before you open any wall
- Step-by-Step: How to Soundproof a Bedroom Wall
- 1. Seal Gaps Around the Wall
- 2. Add Dense Insulation to an Existing Cavity
- 3. Install Resilient Channels or Sound Clips
- 4. Upgrade the Drywall Assembly
- 5. Build a Freestanding or Double-Wall Assembly
- Common Mistakes
- Frequently Asked Questions
- Can I soundproof a bedroom wall without removing the drywall?
- Are foam panels effective for blocking sound through a bedroom wall?
- What is the best insulation for soundproofing an existing wall?
- How can I reduce bass noise from neighbors in my bedroom?
- Do soundproofing walls work for an apartment or rental?
- When should I hire a professional to soundproof a bedroom wall?
- Conclusion
What You Need
Materials depend entirely on which step you stop at, so I’ve grouped them that way.
For sealing (step 1)
Acoustic sealant or acoustical caulk that stays flexible, not ordinary painters’ caulk. Acrylic backer rod for wider perimeter gaps. Foam outlet boxes or acoustic putty pads for electrical boxes. A door sweep or draft stopper for the bedroom door. Weatherstripping for any window or the closet opening. A utility knife, a caulk gun, and a flashlight.
For filling the cavity (step 2)
Dense mineral wool in batts or rolls is the first choice. Cotton batting is a workable budget substitute. You also need drywall screws, a stud finder, drywall saw or keyhole saw, safety glasses and a dust mask, plus wire nuts and electrical box covers if any boxes come loose.
For decoupling (step 3)
Resilient hat channel and the matching drywall screws, which are the one thing you should not substitute. Sound isolation clips if you want to skip the channel and go straight to the studs. A level, a drill, and a helper to hold the sheet while you drive.
For adding mass (step 4)
A second layer of drywall, or Type X drywall if you also care about fire rating. Mass loaded vinyl if you want a lot of weight in a thin sheet. Optional: a viscous damping compound such as Green Glue between layers, applied in a squiggle pattern across the face of the sheet rather than spread edge to edge.
For a freestanding wall (step 5)
Framing lumber, mineral wool, two drywall layers, acoustic sealant, and a plan for the floor, ceiling and the sides. This is the step where load, wiring and structure matter enough that a professional should look at it first.
Before you open any wall
Run an electronic stud finder and knock on the surface before you cut, and map where the wiring runs. Old homes can have knob-and-tube wiring, aluminum branch wiring, or buried plumbing in odd places, and a saw into a live line is a real hazard.
If the drywall is pre-1980s and you suspect asbestos, stop there. Asbestos is common in joint compound, pipe wrap and some textured coatings from that era, and it needs to be tested by a lab and handled by a licensed contractor. Licensed pros are also the right call for anything touching electrical, plumbing or structural load-bearing members.
Sort the rest into two buckets. Reversible projects are door sweeps, weatherstripping, removable panels, mass loaded vinyl hung with Command strips or held by small hooks, and thick curtains. Permanent projects are anything that involves cutting drywall, new framing, or drilling into studs.
Step-by-Step: How to Soundproof a Bedroom Wall
Each step below gets more disruptive and more expensive. Do them in order and stop as soon as the noise drops to something you can live with.
1. Seal Gaps Around the Wall
Sealing is the highest return per dollar on this whole list. Sound moves easily through air, and a wall that would block a lot of tone can still carry a conversation through a quarter-inch crack around a switch plate.
Shut the bedroom door and stand inside it. Have someone speak on the other side of the wall, or play music, then walk the wall with your ear close and note every place the sound jumps. Do it in the room you want quiet, since that’s the only measurement that matters.
Then work through what you found:
- Outlets and switches: pull the faceplate, fill the box with an acoustic putty pad or foam box, then reseal the gap between the box and the wall with sealant. This is the leak homeowners are most surprised by.
- Baseboard, crown molding and the drywall-to-ceiling seam: run a bead of acoustic sealant the full length.
- Penetrations for pipes, cables, ducts and light fixtures: seal the gap and fill the core with sealant or mineral wool, not just caulk the edge.
- The bedroom door: a sweep on the bottom, weatherstripping on three sides, and a closer if it slams. A closed door with a sweep is worth more than most wall work.
- Windows in or near the wall: locking the sash tight, sealing the sash-to-frame gap with removable tape, and adding a second layer of removable weatherstrip.
Judge the result by repeating the same voice test. If speech dropped noticeably, you have your answer and can stop there. Many shared-wall problems are mostly outlets and a door gap.
2. Add Dense Insulation to an Existing Cavity
If you still hear sound after sealing, the wall cavity is doing nothing. A standard framed wall with batt insulation often scores around STC 33 to 36, which is roughly normal conversation passing straight through.
Verify there’s no knob-and-tube wiring or buried plumbing, then cut a small inspection hole near a stud and look inside. If you see dense material already packed in, the cavity is filled and you can move on. If you see framing with little or loose fill, you have work to do.
Mineral wool is the first choice because density does most of the work here. Rockwool and Rockwool Safe’n’Sound are the common names, and the material’s job is to damp the stud cavity rather than trap still air. Fiberglass performs worse in a lightly framed wall because it’s light and springs back, and the cavity resonance stays.
Install the batts without compressing them. Push them into the bay so they fill the depth of the cavity, cut around wiring rather than crushing the batt against it, and staple the flanges so they cannot loosen later. A squashed batt loses much of its performance.
Seal the drywall perimeter and every box again when you close the wall up. Then retest. Insulation alone on a lightly framed wall gives a modest gain, and it’s a much bigger gain when paired with step 4.
3. Install Resilient Channels or Sound Clips
This is the step most people skip, and it’s where a wall goes from “somewhat better” to “genuinely quiet.” Drywall screwed tight to a stud is a rigid bridge. Sound hits the drywall, travels into the stud, and comes out the other side almost as strong.
Resilient channel is an inverted hat-shaped steel or PVC strip that sits on the side of the studs and holds the drywall at one point along its length. The clip or the shape of the channel absorbs vibration, so the two leaves of the wall never touch.
Install it like this:
- Mark the layout so the channel lands where you can still hit a stud behind it. Screws going into the studs defeat the purpose entirely.
- Fasten the channel to the studs with short screws driven through the web, not the face.
- Run the channel level and keep the drywall off the floor. If the new drywall touches the subfloor, you’ve bridged the wall at the bottom.
- Leave the first and last stud unchanneled so the sheet has something to attach to at the ends, or use a clip system throughout.
- Drive the special resilient-channel drywall screws. They look like a wide washer with a flexible washer underneath, and they matter more than people expect.
- Never screw or nail the drywall to the old layer, the studs, the casing, or the baseboard.
Sound isolation clips do the same job with no channel, which is easier in tight spots like a short return wall. One r/DIY reader described channel as “better than nothing” when it’s installed carefully, which is a fair way to put it. Sloppy installation is a short circuit.
Stop and check your results here. If a voice on the other side is now muffled to a hum, you likely only need one more drywall layer to finish it.
4. Upgrade the Drywall Assembly
Adding a second layer of drywall on resilient channel is usually the best value step in the whole project. It adds mass and it adds an air gap at the same time, and those two work together.
Two layers of standard drywall on channel plus dense cavity fill lands a typical bedroom partition in the STC 45 to 55 range, which is roughly where music stops carrying as music and starts carrying as a low thump. Type X drywall is denser and gives a few decibels more, so it’s worth using if fire rating is a consideration anyway.
Mass loaded vinyl is the option if you don’t want the thickness of a second layer. A sheet roughly a third the weight of drywall per square foot can add meaningful mass, and it hangs on screws or clips with adhesive backing at the seams. Handle it flat and wear gloves for edges; it tears easily and it’s expensive to replace.
If you use a damping compound between the two layers, squiggle it across the face of the first sheet and let it spread under the second one. Pooling it or spreading it edge to edge wastes most of what it is doing. Most people looking for an alternative to Green Glue get more out of resilient channels or clips, which decouple structurally instead of just adding a soft layer.
5. Build a Freestanding or Double-Wall Assembly
This is the best way to soundproof a bedroom wall when the noise is bass, music, mechanical equipment, or a neighbor who watches TV at midnight. It’s also the most expensive and the least reversible.
The idea is a second, physically independent wall with an air gap between it and the old one. Instead of one row of studs, you get staggered studs or two separate rows, two drywall layers, and cavity fill in both.
What matters most is limiting the bridges. Sound crosses an air gap far less well than it crosses solid material, but every screw, nail, electrical box and drywall edge that touches the old wall closes that gap back up.
- Leave a genuine gap, usually at least a few inches, and never let drywall, casing or trim touch the old wall.
- Run the two stud rows at different spacing, or offset them so no single stud lines up.
- Fill both cavities with mineral wool and seal both drywall perimeters.
- Hang an electrical box with an acoustic back box if you need power on the new wall.
- Isolate the new wall from the floor, ceiling and the wall on each side.
Construction lawyers will tell you to check whether the load, wiring and structure are affected, especially in a condo or with a load-bearing partition. A freestanding wall adds real weight next to the framing that holds it up.
A well-built freestanding assembly can push a bedroom wall into the STC 55 to 65 range, which is where sound becomes mostly a low-frequency event rather than something you can make out.
Common Mistakes
Filling the cavity with fiberglass only. It’s light, so it damps the stud resonance less than mineral wool does. In a thin framed wall the improvement alone is disappointing.
Leaving gaps open. Every unsealed outlet, switch, baseboard seam and pipe penetration is a direct path. This is why sealing first can surprise people: it fixes a large share of what they thought was a wall problem.
Compressing insulation. Batts pushed into the bay until they’re half their depth lose much of what they were bought for. Fill the cavity; don’t pack it.
Bridging the studs with drywall. If you attach the new sheet to the studs, the baseboard, the old drywall or the casing, you rebuilt the rigid path you were trying to remove.
Using ordinary caulk. Painters’ caulk hardens and cracks, then stops sealing. Use acoustic or acoustical sealant labeled for the job.
Sealing only one side of a penetration. A cable snaking from a neighbouring room into an outlet on your side carries sound along the cable itself. Seal on both sides, and use a putty pad on the back of the box.
Expecting thin foam or panels to stop bass. Dense, low-frequency energy needs mass and air gaps. Light panels sold as soundproofing are absorption products and will not stop transmission through a wall. On r/soundproof, people make this point repeatedly: panels reduce echo inside the room and do very little about sound passing through.
So how do you choose? Match the method to the noise. Voices and TV are mostly a mass and sealing problem, and steps 1 and 4 fix them. Footsteps and plumbing are impact noise traveling through structure, which needs decoupling and often floor or ceiling work rather than a wall fix. Bass and music need mass and an air gap, which means steps 3 through 5. And if you rent, stay inside step 1 plus reversible options until you know how much it helped.
Frequently Asked Questions
Can I soundproof a bedroom wall without removing the drywall?
Yes, partly. Sealing every gap, adding a door sweep, weatherstripping and sealing outlet boxes with acoustic putty pads all work without touching drywall. From there you can add mass without demolition: hang mass loaded vinyl on cleats or hooks, run a surface-mounted resilient channel over the existing drywall, or build a lightweight independent frame in front of the wall. Inside the room, thick curtains and removable fabric panels reduce echo. None of these reach the performance of a rebuilt wall, but they can remove most of the audible transmission.
Are foam panels effective for blocking sound through a bedroom wall?
No. Foam panels and fabric-wrapped absorbers reduce echo and reverberation inside your room, which makes the room sound better. They do almost nothing to stop sound travelling through the wall, because they are thin, light and porous rather than dense and airtight. If your goal is blocking a neighbor’s television, spend your money on mass, sealing and decoupling instead. Panels are worth it only when the problem is sound bouncing around your own bedroom.
What is the best insulation for soundproofing an existing wall?
Dense mineral wool, such as Rockwool or Rockwool Safe’n’Sound, is the best all-round choice for an existing stud cavity. Its density damps the resonance between studs better than fiberglass, which is light and springy. Cotton batting is a reasonable budget option, and dense cellulose works well in some walls. Fill the cavity full depth without compressing the batt, and pair any of these with a second drywall layer on resilient channel, because insulation alone gives only a modest gain in a lightly framed wall.
How can I reduce bass noise from neighbors in my bedroom?
Bass is the hard part, because long wavelengths pass through light, thin, well-coupled assemblies almost untouched. What helps is mass and air: a second drywall layer on resilient channels, mass loaded vinyl, or an independent double-stud wall built in front of the existing one. Seal the door and window leaks first, since bass finds every gap. If the bass is impact noise from footsteps or plumbing above, you need isolation rather than mass, which means addressing the floor or ceiling path too.
Do soundproofing walls work for an apartment or rental?
What works depends on your lease. Door sweeps, weatherstripping, removable tape, sealant applied at baseboards and switch plates, mass loaded vinyl hung with removable hooks, and thick curtains are all non-destructive and come out cleanly. Opening drywall, drilling studs or building a new wall usually needs written landlord permission, and condo rules may restrict changes to common or party walls. Check before you cut anything, because deposit disputes cost more than the soundproofing would have.
When should I hire a professional to soundproof a bedroom wall?
Hire a pro when the job involves structural or electrical work, when the drywall may contain asbestos, when you are building an independent wall next to load-bearing framing, or when your lease or condo rules restrict alterations. Professionals also bring calibrated meters, so they can measure before and after instead of guessing. If your noise is mechanical, such as a rattling duct or a compressor, a contractor can find and fix the source, which no wall assembly will fully solve.
Conclusion
Start by standing inside your bedroom with the door shut and finding out where the sound actually enters. Seal those gaps, add a door sweep, and test again. That first pass takes an afternoon and it solves the problem outright more often than people expect.
If noise is still clear after sealing, match the fix to the noise. Voices and television want mass and a second drywall layer, often on resilient channel. Bass and music want an air gap and more weight, which means decoupling or a freestanding wall. Footsteps and plumbing are a structure problem rather than a wall problem. If you’re renting, stay with reversible treatments until you’ve measured the difference.
Check one room at a time rather than the whole house at once. Soundproofing a bedroom is a weekend project for the first three steps and a larger job than that after, and the results are easier to trust when you retest the same wall the same way you tested it at the start. Building codes, materials and product availability shift over time, so re-check current specs before you buy as you plan this project in 2026.